In this guide, we will look at how to build Custom Windows Images to deploy via PXE using FOG. (Free and Open Source Ghost)
You will need:
A Windows Distro you can activate. For this guide: We will use Windows Build 10H22.
A Server configured to use FOG, with PXE (Pre-Execution Environment) working
A Virtualisation Platform such as VMWare or XCP-NG) or a physical workstation you can use a physical disk on
Applications to install. (We are going to pre-bake)
A few hours spare
Install Windows
Boot up your VM and install Windows using your disk or disk image. This does take some time to complete. Once complete, follow Mini Setup, to get the OS ready. Create a local account, not a online account that uses a Microsoft Account. This is important, as you will need it later. You will need to make sure the CD Drive is set as the 1st boot item in the BIOS btw.
IMPORTANT: Once actually on the desktop, do not join the machine to a Network Domain, if you plan to use a Server Client Network.
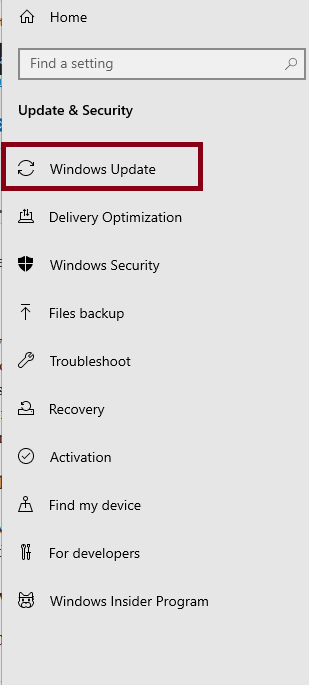
Run Windows Update
Run Windows Update, by pressing the Windows Key and I, then going to Windows Update. Your Reference PC will reboot several times during the update process and you may need to come back to this page to check for updates, until all updates are installed.
Install Applications
Once all updates are installed, install any software you need to install. (IE: Office etc) Do not install software for one user account, as the Sysprep will fail later on, if you do this.
Windows Update
If you have installed Office, run Windows Update again, so the updates for Office are installed. Skip this, if you didn’t install Office. Reboot as needed.
Sysprep
You will need to prepare the Operating System for deployment. Before doing this, go into the BIOS and find the Boot Section. Make sure the Network Card is set as the 1st boot item. Save and exit. The machine will try to contact PXE to boot, but you can press ESC to get it to boot to the Hard Drive. Again, press ESC, if the machine tries to boot to CD. (Or eject the disk)
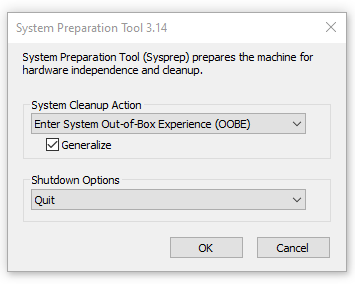
Click on Start > Run. Type:: C:\Windows\System32\Sysprep into run and click OK. In the Sysprep folder, right click Sysprep.exe. Click Run ad Administrator. Click Yes, when the User Control Prompt asks you if you want to run the program.
On the Sysprep Window, make sure Enter System Out Of Box Experience (OBBE) is selected and the Generalise box is ticked. In Shutdown Options, click Quit. Click OK.
Sysprep will work it’s magic and with a bit of luck, should close the Window. If it throws an error, look at the Logs in C:\Windows\System32\Sysprep\Panther. You need to look at setupact.txt and setuperr.txt and google the error, to diagnose. Once fixed, run Sysprep again.
Shutdown the Reference PC.
Setting Up On Fog and Registering the Machine
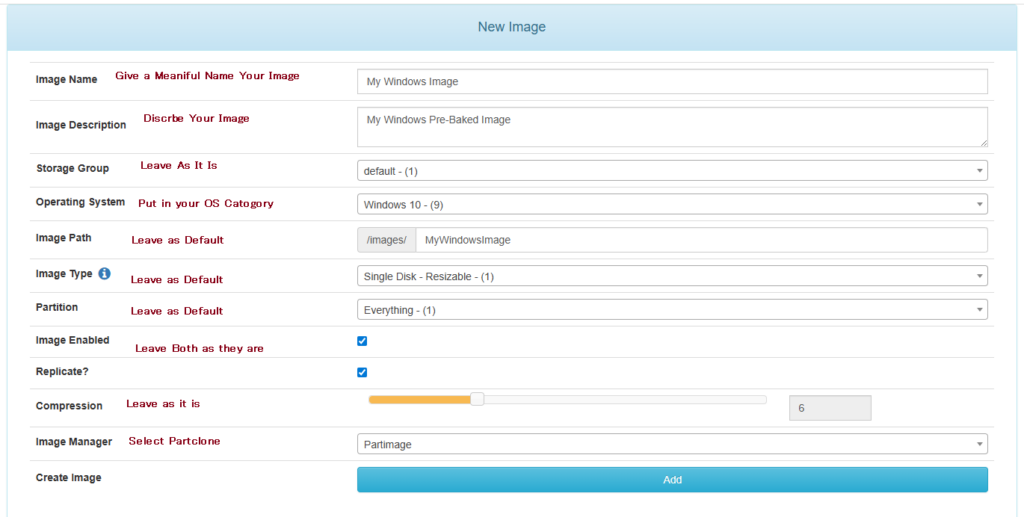
On your FOG Server, go to Images on the top menu and then Create Image on the side menu. Fill in the form as shown and click Add.
On your Reference Workstation, boot to the Network. On the Fog Window, select Quick Registration and Inventory. This will register the machine in FOG. Once done, power down straight away. We do not want to bot into Windows! (You will need to use your FOG Username and Password to authenticate to the server)
Prepare to Image
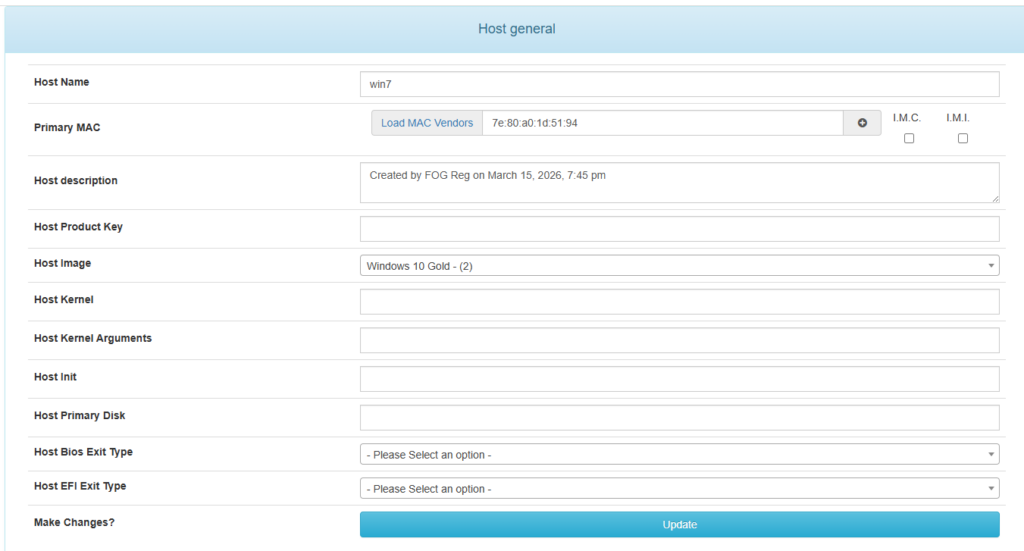
On the Fog Server, click the Hosts Button. Click List Hosts and select the host you just created.
Select the Image You just created and click Update. Go back to your Host and click Tasks. Now click Capture.
On the Task Window, leave all options as they are and click create.
Capture The OS
Now we can capture the OS to the server. Boot your Reference Workstation to the Network. After a few minutes, the capture screen should show as follows:
This may take some time. Afterward, the machine should reboot, so either you can keep hitting escape and boot to in Setup or shut the machine down.
Deploying the Image
By Default, this should be the custom image for installing. (Unless you have created others. So on a registered machine, boot to the network and select Deploy Image. Authenticate and then select the image you want to deploy.
Well done! You have custom images that take half the time to deploy than manually doing it, or using tools such as Microsoft Deployment Toolkit.
Everybody knows Henry, the famous Red and Black Vacuum Cleaner, with the smiley face, which often end up tipping over or getting stuck in doors. 😂
Henry – The Almost Indestructible Tub Vac – with a Cheeky Smile:)
An early version of the Henry Tub Vac
These little Vacuum Cleaners were invented by Chris Duncan, MBE, who launched Numatic in 1969, having seen a need for a rugged and reliable cleaner to clean the inside of boilers.
At a trade show in the mid-1970s, founder Chris Duncan and a salesman dressed up one of their commercial machines with ribbon, a Union Jack badge, and a hat, then drew a pair of eyes and a crude smile on the bucket. The next day, visitors noticed it and laughed; Duncan then decided to ask his advertising team to design a proper ‘face’, which would become a staple of Numatic’s range, making their products easily identifiable from their competitors’. This is where the smiley face comes from:)
In 1981 Henry became the first Numatic International model to have a name on its lid, which had become to look like a Bowler hat, replacing the ‘Numatic’ brand logo. Henry was also one of the first vacuums to use large-capacity microfibre dust bags known as HEPA-FLO bags, made of a material that retains dust and is stronger than the paper usually used, which can tear.
Henrys were originally manufactured in Bedminster, Dorset, until Numatic moved production in 1990 to Chard, Somerset.
Henry gas become a household name, with millions sold world wide. He also has a wide selection of Brothers and Sisters. (James, Hetty, Charles and George, to name a few) These little hoovers come in all shapes and sizes, and some can up up liquids as well as solids. If you want a decent little Tub Vac, I recommend getting a Henry. (Or one of his Siblings)
Henry has a cult following and even has his own Fan Club on Facebook, which I am a member of.
Regular Henry Maintenance
Maintaining your Henry is a important job, as it will help prolong his life and make cleaning easier. A Henry that is shown a little love and is well looked after, should give you years and years of faithful service.
I know someone who has a Henry from 1992, which is still on it’s original motor and is going strong to this day!
Here are my top tips for keeping your Henry working properly:
Think Health and Safety: Always switch off your Henry at the power button after every use and remove the plug from the wall, rewinding \ wrapping the cable round the hat (Depending on your model) when not in use.
You should always switch off and unplug your Henry, when maintaining it.
Important Checks: Cable and Plug
You should check the plug for damage, each time you use your Tub Vac. Make sure the pins are not damaged and that the sealed plug itself isn’t damaged. You should also check the cable, making sure the insulation is not damaged. DO NOT USE, If the cable or plug is damaged. You should also make sure that the cable rewind is working, if your machine has one.
Empty The Bag Regularly
Changing \ emptying the bag, will help to keep good suction on your Henry. I empty the dust bag, when it is 3 quarters full. I prefer to use Microfibre Bags, as they can be reused.
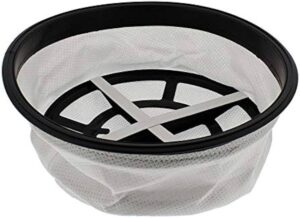
Microfibre Bags
You will need to unclip and lift off Henry’s Hat, to access the dustbag. The filter lives on top of the bag, so you will need to remove this too. To empty the bag, wear a dust mask and bang it against the inside of the wheelie bin. Once a month, wash the bag in warm water with a little detergent and hang it to dry, replacing it with another microfibre bag, while the wet one dries. If you use paper bags, replace it, when it is a third full and dispose of the old bag.
How to Put Henry’s Hat Back On
Getting the hat back on Henry can be quite tricky. You need to make sure that the word Henry, is aligned with the nozzle of the hose. This means making sure that the word Henry, is right at the front. Make sure also the filter is in properly, or the hat will not go on. Then it is a simple case of clipping the hat down, by pushing in the securing clips and away you go!
Clean the Head
It is a good idea to remove the head of your Henry and give it a clean. A blocked head will not suck up anything, so it is a good idea to give it a clean every week.
If it is stuck and won’t come off the pole, do not panic! Either:
Hold the pole in one hand and place both feet on the head. Using your weight, press down and twist the poles. The poles should release easily. If they are being stubborn, use WD40 or a drop of Washing Up Liquid, to lubricate the pole.
Put the head and pole in the sink and pour boiling hot water on it. Twist and the pole should be able to be puled free.
The best way to clear any dust from the head, is to use a wire bottle brush. Use this to clear any bits of dust and other debris. It is a good idea to use a cleaning wipe, to clean the exterior of the head as well.
Clean the Poles
The poles can also easily get blocked and prevent good suction. I use a broom handle to clear blockages in the poles, once I have separated them. This will push any debris out the poles. I wipe my poles once a week with a cleaning wipe.
If your hose is blocked, you can use the same method. However, slowly ease the broom handle up the pole, pulling it over slowly. This will push any debris out.
Give your poles a good wipe with a good quality Chrome Cleaner. I suggest using Bar Keeper’s Friend.
Clean The Filters
I clean my filters once a week. This involves removing Henry’s hat. Thankfully this just unclips and lifts off. Remove the filter and take it outside. Bang it against the wall, to release any debris. Put the filter back on, (making sure it goes in the right way) then replace Henry’s hat. This only goes on one way and should have the word Henry, aligned right above the eyes on the tub. Clip the hat back on and test that it is secure, by trying to lift him with the handle.
Clean the Wheels
The wheels often get forgotten and over time, can get gunked up, which will stop Henry from moving across the floor. To clean the wheels, spray them with WD40 once a week and use a old toothbrush, to remove the build up of gunk. Then give a wipe with Disinfectant, sprayed on a Micro Fibre Cloth.
Wash out the Tub (The Bit The Dust Bag Goes In)
I wash out the tub on a weekly basis. I know he has a dustbag in, but still the tub does easily get dirty.
Think Health and Safety: Always make sure the tub is fully dry, before reassembling! Do not get the hat wet, as you will risk damaging Henry and possibly electrocuting yourself in the process!
First, unscrew the hose and place aside. Then unclip and remove Henry’s Hat. Then take out the filter and place aside. I put him in the sink for this and only fill him with 3 500ml jugs of warm water. This is around 1 1/2 litres. Do not overfill, as the water will come out the hole where the hose connects to.
Add a capful of your favourite disinfectant (Do not use Bleach) and then use a cloth to gently wash the inside of the tub. If it is really dirty, you can use a brush for deeper cleaning. Once done, carefully top the water down the sink. To dry your Henry, you can either use Blue Paper Roll and thoroughly wipe the inside, removing all moisture.
If you can afford more time, you can place Henry’s tub upside down on Blue Paper Roll and leave it to air dry. Once fully dry, reassemble your Henry and he is good to go!
Wash your Tools (Crevice Tool, Furniture Brush, Dusting Tool)
Your Henry Tools also should get a weekly clean. Over time, these will get rather dirty, especially the brushes. I wash mine in the sink, with mild detergent and then hang them up to dry, before putting them back on their caddies. To get the crud out the brushes, use a old comb, to brush out the debris. Quite often, hair and other debris, will get stuck in the brushes, which is a magnet for bacteria and also can clog your Henry up. The same goes for if you have a Henry with the air driven brush. However normally the air powered brush has a removable roller bar, which makes cleaning easier.
While you are at it, visually inspect your tools, to make sure there are no cracks or breakages.
Wipe down your Machine
I wipe down my Henry after every use. I usually spray my Disinfectant on a Micro Fibre Cloth and give him a good rub down. This keeps my Henry looking his best. Remember to also do underneath the handle and bottom of the tub, as these are often places that are overlooked.
For the air holes, I use a can of compressed air, as it gets into the grooves and releases any gunk that may be stuck there. It may also be a good idea to use a cleaning wipe to give the power cord and the plug a wipe once a week as well.
For cleaning the vents on the underside motor casing, I once again used a good old can of compressed air. It is safe, as there is no liquids involved and it will allow you to get any trapped dust out, which can cause your Henry to overheat. A overheated Henry will eventually cut out (as it has a thermal overheat cut off on the motor) or in the worse case scenario, could ultimately catch fire!
So make sure cleaning the underside motor vents is part of your weekly Henry Maintenance.
Check Your Hoses For Splits
Make sure your hoses are intact. A break in the hose can cause complete loss of suction, as the air will escape through the breakage. You can temporally use Gaffer or Duct Tape to seal the breakage, but I do not recommend this, as it may not fix the problem. The best solution, is to order a new hose, from My Henry. (See Below)
Replace Parts When Worn Out
If you need spare poles, accessories or a new machine, visit My Henry, which is your one stop shop for everything Henry Hoover!
Store Your Henry Properly When Not In Use
I make sure that both my Henry Tub Vacs are stowed properly when not in use. This means putting the pole and brush on the hook, on the back of the machine and putting his tools nearly back on their holders on the back of the machine. This helps to make sure Henry is ready for his next cleaning task. Both my Henry Tub Vacs, live against the wall in the cleaning store, when not in use. This makes both machines quickly accessible, when needed.
Bonus Tip: Stopping Your Henry From Tipping Over
It’s a problem any Henry Owner faces… Your Henry tipping over when you drag it along. However, there is a solution. (WEIGH IT DOWN!)
To do this, we have a couple of options:
Method One: Silicone Sands
The 1st solution is a bit messy, but rather fun.
What you need is a bag of sand. I suggest Rainbow Eco Sand from Amazon, as you do not need alot and this should be more than enough for what you need. Then you will need Silicone Resin. You can also get this from good old Amazon.
Now to weigh down your Henry…
Tip a small amount of sand into the tub of your henry. You only need around 2 inches of sand, which needs to be a level layer.
Mix the Resin and pour it over the sand, making sure you evenly coat it
Wait 24 hours for the Resin to dry, before reassembling
Method Two: Dumb Weights
The 2nd solution, is to put a fitness weight at the bottom of the tub. This is a good method to use, if you are unable to use the method above. This method is a little less invasive, but will still make the tub heavy enough, so it won’t fall over. Compared with the 1st method, this will make your Henry quite a bit heaver. So beware of this, when deciding which option to take.
Final Thoughts
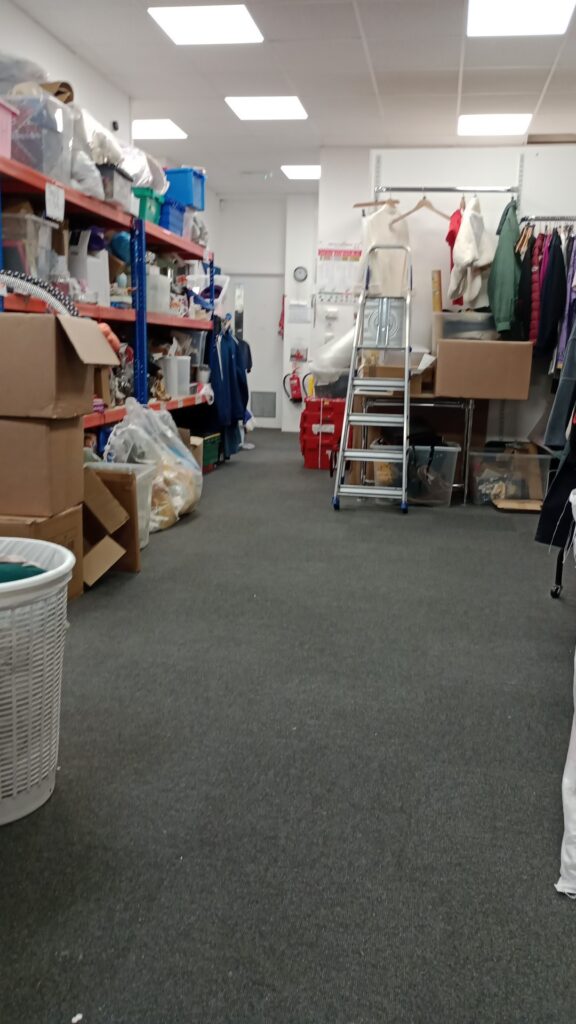
A well looked after Henry, will help your carpets look fantastic. Here is a picture of our Stock Room, after I maintained my machine. It looks fantastic. However, you might notice the white marks on the carpet. This is from the Shake N’ Vac I used to make the carpets smell nice. The white marks will fade, as they are caused by people walking over the shake and vac, before I had a chance to suck it up.
However, this will dissipate quite quickly and won’t stain the carpet. (Kath would be on my case if it did that and I don’t want that!!!!!)
In Commercial Premises, the law prescribes that we must carry our a full evacuation of the building regularly. Regulatory Reform (Fire Safety) Order 2005) These evacuations should happen at least ONCE every SIX MONTHS and should encompass the full evacuation of the building, to an external assembly point. The reason for these drills, is to make sure everyone knows what to do, if the fire alarm does sound.
So, lets talk about the best practices in a fire drill.
Never Announce the Drill
Fire Drills should be kept a secret. Only those that need to know, should know when the alarm will sound. This is done to make sure that people do not ignore the alarm when it sounds. I know about the fire drill at work next week, because of my position. This is ‘need to know info.’
Don’t Make it Obvious
You don’t want to make the evacuation obvious. That is why it is important to activate the alarm from a point where there are lots of people. Activate the alarm the normal way, using a ‘break glass unit,’ either by activating the same way as you would when there is a fire, or using the test key. (Which goes into the bottom or side of the break glass unit)
Make Sure You Review Your PEEP Documents
If you have disabled people, make sure that you have reviewed your Personal Evacuation Plans. (PEEPS) This will help you to plan the evacuation and allow you to ensure disabled people are evacuated safely.
Let Your ARC Know, If You Have A Monitored System)
If you have a monitored system, it is important to let your Alarm Monitoring Centre know you are carrying out an evacuation. This will prevent them from calling out the Fire Service. If you do not have a monitored system – you should ring the non emergency number for your local Fire Authority and let their control room know. You can normally find this number on the website for your local Fire Authority. It may also be a good idea to let neighbouring properties know, so they do not call 999.
Make Sure Your Fire Marshals Help To Clear The Building
Your Fire Marshalls should make sure that the building is fully evacuated. Those Evacuating, should stop what they are doing and be encouraged to leave their personal possessions where they are. Evacuation should then be carried out via the nearest exit.
Proceed to the Assembly Point
Make sure everyone goes to the Assembly Point and make sure they stay there until the evacuation is stood down. It is a good idea to keep someone at a safe distance from the building, to make sure other people do not enter the building, until the evacuation is stood down. The Assembly Point, should be at a minimum of 50 feet away from the building.
Standing Down
The evacuation should be stood down, verbally. “Thank you, it is now safe to go back inside the building” is a example you can use. If like us, you use 2 way radios, make sure that you clearly state something along the lines of: “Fire Alarm Stand Down, I repeat… Fire Alarm Stand Down.” This lets everyone know that the incident is stood down and that it is safe to go back into the building.
Log in the Fire Alarm Log Book
Make sure that you log the evacuation in your Fire Alarm Log Book and let the ARC \ local Fire Authority know, the drill is complete.
What is the best achievable time to evacuate the building?
Ideally, the building should be fully evacuated within 2 minutes
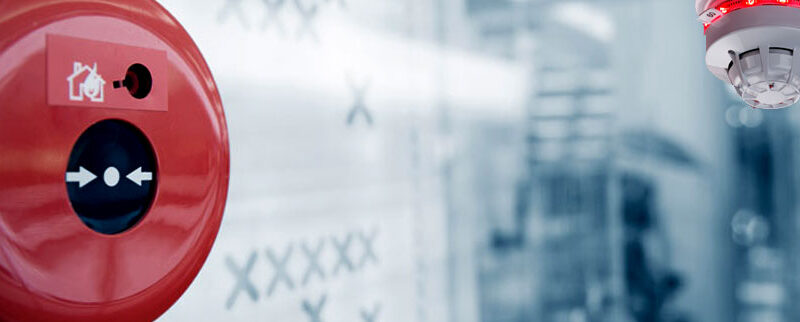
A Fire Alarm System in any business premises, is a valuable and vital bit of kit. It keeps us, our equipment and our stock safe. But how does it work? In this article, we shall delve in and find out.
A Diagram of A Fire Alarm System
This is a basic setup. There are 2 zones (areas that are monitored) and each has a call point and a bell, as well as a smoke detector. The system is wired in a continual loop, which is then fed back to the Control Panel.
Fire Alarm Panel
The Control Panel is the brains of the operation and keeps an eye on the system and it’s functions. It has several indicators, to show the location of a fire, the location of any system faults, zones that may have been disabled and have controls to silence and reset the system, among others. controls the system’s functions, and they can be programmed using software provided by the manufacturer or, in some cases, through the front panel buttons.
It contains a motherboard, with integrated memory and a microprocessor. The Board has connectors for each device. This is usually via a terminal block at either end of the board. This is soldered connected to the motherboard The Fire Alarm Panel will normally run it’s own software, which controls the board. This software is essential for tasks like programming devices, managing zones, and displaying alerts, allowing the control panel to identify the exact location of an alarm or fault.
The system may have been setup to prevent unauthorised use of the programming and other controls. This may be a key, a combination of buttons, (which are used as a pass-code) or both. On many systems, you will need to access the ‘Supervisor Mode’, before you can silence and reset the alarm.
Addressable Systems
In more complex systems, such as in offices or hotels, the system may be addressable. This will show the exact location of the suspected fire and which device has been activated. For instance, Zone 2 – Kitchen (Smoke Detector Activated) This makes it easier to locate where the alarm has been activated from and allows investigations to be carried out, to determine if the fire is real or if it has been activated for other reasons. (IE: Steam)
Pre-Alarm Circuit
On systems in hotels and offices, the system often has Pre-Alarm Circuit. When the alarm is activated, it will not sound the alarm throughout the building. (This prevents unnecessary evacuation) Instead, it will either activate a single bell, (for instance, in reception) or will make a buzzer sound on the control panel. (In a CCTV Control Room) Either way, the red light for the corresponding zone will flash on the control panel, to indicate where the alarm is sounding from. As mentioned above, on addressable systems, the system will show which device has been activated and it’s location.
On some systems, Pre-Alarm will only activate the bells \ sounders in the zone of origin, as well as on the Control Panel. The system can also be programmed to send a text or paging message, depending on the setup. (This is only usually the case in very large buildings, such as Hospitals or very large Office Blocks.)
Pre-alarm will initiate a countdown, which will allow staff time to investigate the reason for the alarm going off. This allows them to locate the equipment activated and determine if it is a false alarm and reset the system if needed. This timer can be anywhere from 2 minutes up to 5 minutes. Once the countdown timer reaches zero, the system will go into ‘full alarm state’ and sound the alarm throughout the building.
If a fire is found, full alarm can be activated, by smashing the glass on a call point. This will stop the countdown and immediately sound the put the system into alarm state. The alarm can also be activated from the main control panel, by accessing supervisor mode and then pressing the Evacuate button. (On some systems, this button is named Sounders \ Off. however, it does the same thing)
Powering the System
The Fire Alarm System is wired into it’s own circuit on the building’s electrical system and should have it’s have it’s circuit breaker on the main Distribution Panel. It will also have it’s own connector to the mains, which does not have a switch. However, some systems have a key switch, which allows the mains power to the panel to be isolated. In general terms, the power should never be disconnected.
The system should have a battery backup, to allow the system to continue to operate during power outages. On smaller scale systems, this is a internal battery, similar to a car battery, but on a smaller scale. Alternatively, the system may have it’s own uninhabitable power supply, Often this is located near the fire alarm panel and is normally a white box, with a green light. (This indicates that the battery is charging)
In larger buildings, such as Hospitals, the generators will power the system.
What happens if I disconnect the Smoke Detector Head?
The Control Panel would flash fault and display the zone \ location, if you disconnected a Smoke Detector Head. On addressable systems, it would show the exact room that the fault is in. It is important never to disconnect or cover a smoke detector head. It is there to save your life! Additionally, you could get into trouble, for fiddling with the system.
So How Does It Work?
Now lets look at how it works.
Scenario 1: Smoke Detectors
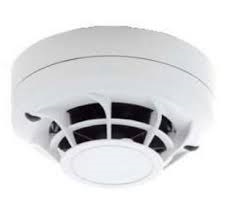
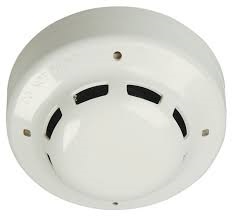
Smoke Detector
In this scenario, Leslie has left a heater on in zone 2. Near to the heater, is a tea towel that is hung on a rack. The tea towel falls off the rack, lands on the heater and begins to smoulder. Very quickly, the situation escalates and a fire breaks out. Smoke quickly begins to fill the room, which the smoke detector detects. This is through a beam that is in the smoke detector. The smoke is thicker than air and is what will break the beam.
This causes a break in continuity in the circuit and sends a SOS message to the control panel.
The Control Panel will know where the fire has been detected from and will then send a message to the bells, making them start to ring. – Thus alerting people in the building there is a fire. On the control panel, a buzzer will sound and a red light will flash in the fire zone, where the alarm has been activated from. Now Leslie knows there is a fire in Zone 2, which is upstairs.
Scenario 2: Heat Detector
Heat Detector
In this scenario, Leslie has left a heater on in zone 2. Near to the heater, is a tea towel that is hung on a rack. The tea towel falls off the rack, lands on the heater and begins to smoulder. Very quickly, the situation escalates and a fire breaks out. The heat from the fire, activates the heat alarm, This causes a break in continuity in the circuit and sends a SOS message to the control panel.
Heat Detectors, use a thermistor, bimetallic strip. The alarm will go off, when the heat rises above a certain temperature. (Usually above 95c.)
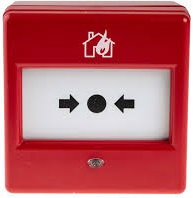
Scenario 3: Call Points (Also known as Break Glass Units)
Break Glass Unit
Leslie is making something to eat in the microwave. However, the microwave is faulty and bursts into flames. Leslie goes to the nearest Fire Alarm Call Point and breaks the glass. This causes a break in continuity in the circuit, thus sending another SOS Message to the control panel. This also causes the alarm to sound and zone 2 to flash on the control panel.
On older units, there was a glass panel, which had to be broken, to press the button. Break glass units on systems built before 1990, had a little hammer connected to it by a chain, which you can use the break the glass. However, after 1990, this changed. You need to only use your finger to press hard on the glass.
Other Components
Repeater Panels
In larger buildings, like Government Offices and Hospitals, there may be repeater panels. These panels act like the main control panel and may be able to silence and reset the alarm. However, they are designed so that you do not need to walk to the main control panel, which could be several floors down. It allows Fire Marshall’s on the floor in question, to see where the alarm has been activated from. These panels may be in a stairwell or by the Nurses Station.
Autodiallers
In many buildings, (including ours) the alarm is connected to a autodialler, which will dial out, when the alarm is activated. Years ago, these were linked to the Fire And Rescue Dispatch Centres and would send the Fire Brigade automatically. These days, systems are typically connected to an Alarm Receiving Centre, also known as a ARC. The ARC, will receive a notification that the fire alarm has been activated and they will then phone to see if the alarm is genuine or not. If the alarm is genuine, they will arrange for Fire and Rescue to attend. If not, they will close the call down on their systems. This was designed to lower the amount of false alarms and prevent unnecessary Fire and Rescue attendances.
There is one exception to this and that is in Hospitals. Hospitals have lots and lots of people in them and makes evacuation very hard. Hospitals do have horizontal and vertical evacuation procedures in place, but this is outside the scope of this post. In the event of a fire, the fire alarm system in a Hospital will always send a message to Fire and Rescue and will cause a priority alert to be shown on their screen. This is why you will quite quickly see fire engines turn up, if you have been in hospital and heard the fire alarm go off.
Alarm Beacons & Paging Systems
Alarm Beacons will flash, when the alarm activates. This is vital for those that are deaf and cannot hear the alarm. Paging Systems can send a pager message or a text message to a deaf building user, alerting them of a fire.
Door Closers
Automated Door Closers, are wired to the system. These are held open by a magnet, which de-energises, when the alarm goes off.This helps to stop the fire and smoke from spreading.
Automatic Shutdown
In buildings that have Air Conditioning and Ventilation Systems, an auto shutdown will automatically switch these systems off. Again, this helps to stop the fire spreading.
Sprinklers
Fire Alarm Systems are often linked to the sprinkler system. This can be either a water based or C02 based system. It also will have it’s own controller linked to the fire alarm system. However, this is outside the scope of this article.
So that is how a Fire Alarm System works. I hope you found my post interesting.
Fire Alarm and Emergency Lighting Tests must be done on a weekly basis, to make sure that systems are working correctly and that equipment operates. In this guide, we will look at testing both systems and what steps need to be carried out.
This is a LEGAL REQUIREMENT, (under The Regulatory Reform (Fire Safety) Order 2005) in all Commercial Premises, Hospitals, Care Homes, Schools, Places of Worship, Offices and buildings open to the public. Also in Blocks of Flats, where there is a wired fire alarm system, Government Buildings and even Pubs and Clubs to name a few, are covered by this legislation.
Your company should have a dedicated form or a Fire Alarm Log Book, where these tests are recorded, It is important to record all tests each time
These tests should be carried out by a competent person, who has been trained to do so. I am a competent trained person, so I assist my manager with these tests.
Emergency Lighting Tests
The Emergency Lights, are designed to come on automatically, when the power fails. This fail safe equipment, is also designed to activate, when the circuit breaker trips, making sure that there is adequate lighting at all times, for whatever the reason why the normal lighting fails. They work, by using an Automatic Transfer Switch, which switches the power over to the batteries, when the mains power fails. They should always gave a green LED lit, to indicate they are charging properly. Call in an Electrician, if the green light turns red, or if the green light is not illuminated. -This normally indicates that the batteries are not charging.
Emergency Lighting Test Key
To test the Emergency Lighting, you will need a fish plate key. You need to insert the fishplate key into the test plate on the wall and push the key downward. This should cause the emergency lighting to activate. You will then need to walk about the area you are in and make sure the emergency lighting properly activates. Report any emergency lights that do not illuminate.
Remember to put the switch back in the off position after testing, otherwise the emergency lights will stay on and this will drain the batteries!
Fire Alarm Testing
If your Fire Alarm System is monitored, it is important to let the Monitoring Centre know you are doing an alarm test. The Fire Service may be called, you fail to let the Monitoring Centre know you are testing the system!
Usually, this is a automated system, which will put the system onto “test” for a short period of time and will not send an alert to the motioning centre. After a short period, the system will go back into monitor mode automatically.
Fire Alarm Call Point
Now we need to test the Fire Alarm itself. Testing from the Panel is not a permitted way of testing. You should activate the nearest call point. On the older units, you need to insert a key into the bottom, which drops the glass. On newer units, activate as normal, by pressing the black button. Make sure that the alarm sounds throughout the building. To reset, push the bottom of the alarm upward, which will reset the call point. Now you will need to go to the Fire Alarm Panel and reset that. (Ours requires the key and then pressing silence then reset.)
If for what ever reason, you need to sound the alarm again, (You might see smoke, fire or something smouldering) operate the nearest fire alarm call point, by breaking the glass.
You should perform the fire alarm test at the same time every week, by activating a different call point, each time you test the alarm. I helped Bethan do the test today and we tested the call point on the shop floor, which I activated.
Depending on how your system is setup, this should activate the Fire Bells, the Electronic Sirens, Voice Modules, (which will announce something like: “The Fire Alarm is sounding… Please leave the building via the nearest exit”.) or the flashing Alarm Beacons. In our shop, the electronic sounders also have flashing beacons integrated into them, which flash when the sirens so off.
Remember to record the test and which call point was activated. Report any issues with the fire alarm immediately.
You should also make sure your Fire Alarm System is serviced Bi-Yearly, by a BAFE Accredited Fire Alarm Company.
Automatic Fire Doors
You should make sure that your automatic fire doors close, when the alarm goes off. These doors, use a magnet which keeps the door open. When the fire alarm sounds, the magnet de-energises, which causes the door to automatically swing shut, thus preventing a fire from spreading. You should make sure that any automatic doors shut, when you do your fire alarm test.
These doors, should never be propped or be held open by any other means. (Such as the use of a door wedge, propped open with a fire extinguisher, or held open with string. This can stop the auto-closer from working, which could cause a fire to spread. This is separate from the auto-closer you might see on some doors. These will automatically close the door, each time. However, they cannot be permanently held open. Automatic auto-closer can be kept open at all times, as the magnet holds the fire doors open.
Report any auto-closer , which fail to operate, when the alarm activates.
Fire Safety in the workplace is everyone’s responsibility. In this guide, we will look at how you can keep yourself and others at work safe.
Fire Risk Assessment
Your employer should have carried out a Fire Risk Assessment. A fire risk assessment is crucial to the fire safety process, you unable to correct and control what you’re not aware of. These risk assessments are performed by the qualified person of responsibility to find potential fire hazards and risks in a building or area.
A fire risk assessment includes identifying what could potentially cause a fire and control measures to reduce the risk of a fire occurring. This may include installing sprinklers or smoke detectors and making changes to wiring, appliances, and storage areas. They are conducted at any time of the year and should be done regularly as part of any routine inspections.
The government recommends that risk assessments should be carried out by suitably competent fire professionals. This Fire Risk Assessor is competent at the prescribed level and can carry out a fire risk assessment of a premises. Many assessors work as specialists in a very particular sector, such as hospitals, construction sites, manufacturing, etc., but they also have a very broad understanding of different industries as well.
Identifying Risks and Hazards, during your Fire Risk Assessment
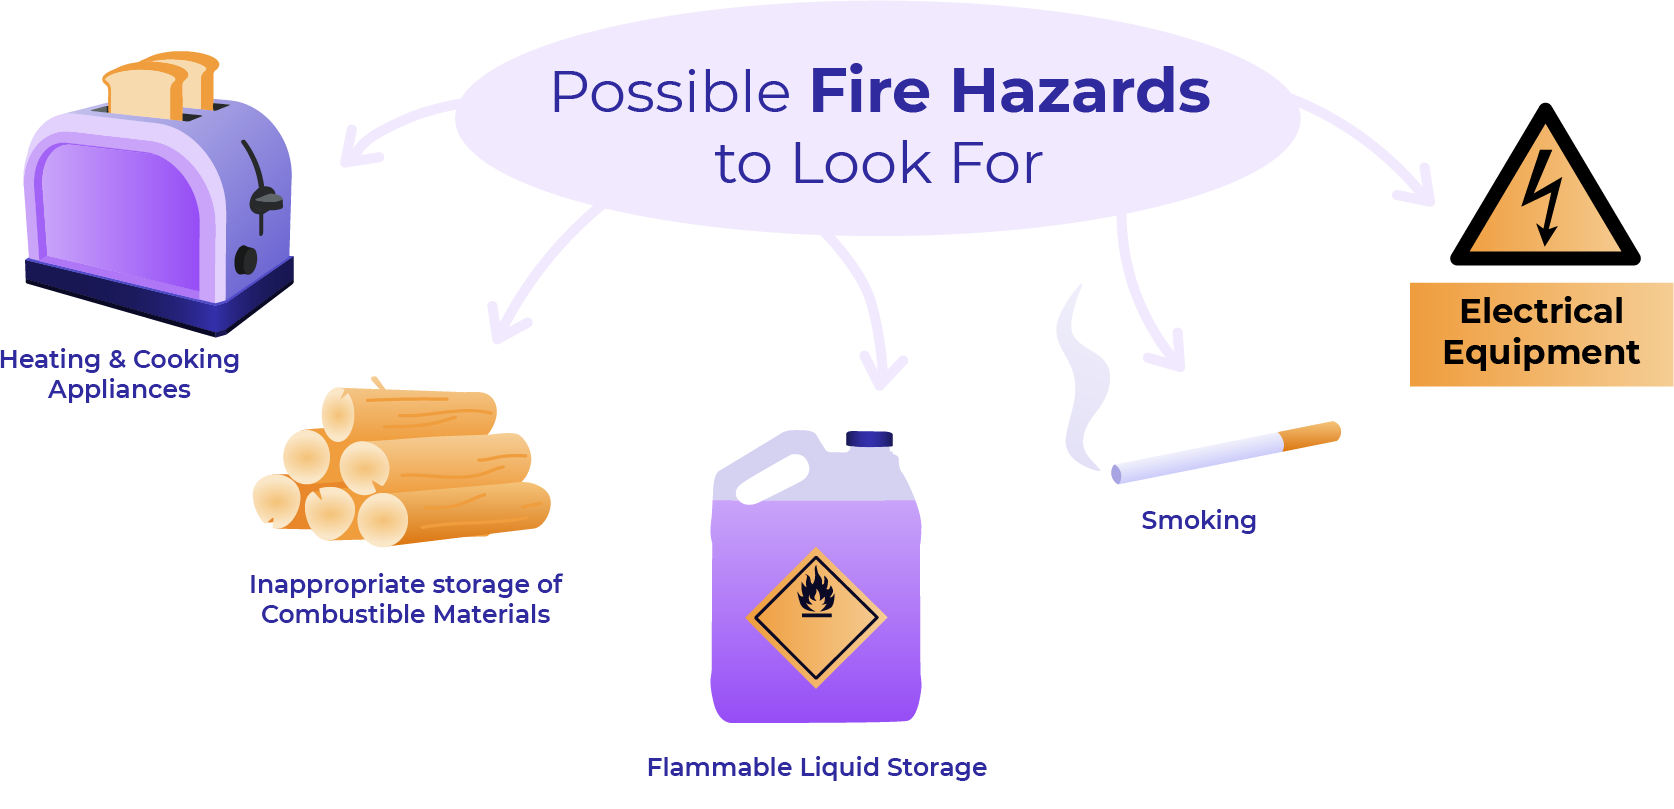
The number and type of hazards will vary from place to place and sector to sector. However, there are some common hazards that you can identify, and mitigate against.
Electrical Equipment: Overloaded circuits, lack of maintenance can cause equipment to become faulty. Make sure all electrical work is carried out by qualified electricians and ensure that all portable appliance testing (PAT) is up to date.
Heating / Cooking Appliances: For cooking appliances, keep things clean. A build-up of materials can catch fire. Take care if wearing loose clothing, and NEVER leave cooking unattended. For heaters, keep them away from clothes, curtains and furniture and never use them for drying clothes.
Inappropriate Storage of Combustible Materials: Empty bins regularly and keep evacuation routes clear of any flammable materials.
Flammable Liquid Storage: Glues and other solvents are another source of fires as they are likely to combust if not stored correctly.
Smoking: Keep designated smoking areas away from the building and provide proper ash bins for disposal near these areas.
Fire Alarm Test
A manual call point should get activated to test the operating effectiveness of the Fire Alarm System to safeguard the persons on work premises. They should be checked weekly once and recorded in your site logbook. Simply activating the alarm at the fire alarm panel, is not acceptable.
Emergency Lighting Test
Every Emergency light, should be tested weekly. This should be logged on the appropriate form. Emergency Lights that do not work, should be fixed, as soon as possible.
Fire Extinguishers
all Fire Extinguishers should be located in a reachable spot. As soon as an employee can identify them, the employees must know which type of extinguisher they are using. Fire Extinguishers should be maintained by a repeatable company, every 6 months.
Keep your Fire Exit Clear
Fire Exits must be kept clear at all times. This means making sure that exits are kept clear from obstructions and exit doors should be well maintained. Panic Bars \ Pads should be easily operable and where Emergency Egress Buttons are present, these need to be tested every week, to make sure they release the doors.
Fire Drills
Fire Drills, should be carried out, either yearly or half yearly, depending on your Fire Risk Assessment. You should aim to evacuate in less than 2 minutes, during a fire drill.
PEEP (Personal Emergency Evacuation Plans)
If your workplace has disabled people, PEEPS must be in place. This should include what help a disabled person requires when evacuation and any reasonable adjustments are needed. This may include escorting someone out of building, special equipment, (such as a EVAC Chair) or providing Refuge Areas.
That is the basics of Fire Safety… More information can be found on the HSE Website.
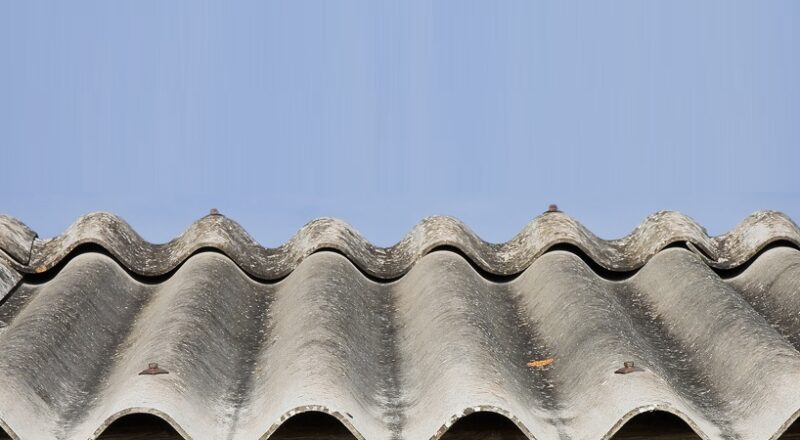
Asbestos is a group of naturally occurring fibrous minerals that were once widely used in building materials for insulation and fire resistance. Asbestos is is a health hazard when its fibres become airborne, which can happen if it is disturbed or damaged, leading to serious lung diseases. Although banned in the UK in 1999, buildings constructed or refurbished before 2000 may still contain it, and its handling is now strictly regulated. It may hide in cement, floor tiles, insulation, walls and pipes.
Asbestos in your home can be dangerous if disturbed. If licensed professionals encapsulate it, or it remains in good condition and undisturbed, the risk is lower. But as asbestos ages, wears down or is disrupted, the risk increases. No amount of exposure to asbestos is safe. Prolonged or repeated exposure can cause mesothelioma, lung cancer and other asbestos-related diseases. Asbestos fibres can get stuck in tissues in your body. These fibres in your body can cause irritation that over time can lead to the development of Mesothelioma. This aggressive cancer forms tumours on the lining of the lungs, abdomen or heart.
Asbestos is a natural mineral known for its strength and heat resistance. Toxic asbestos fibres were mixed into construction materials like cement, floor tiles, insulation, walls and pipes. Many older homes, particularly those built before the 1980s, still contain these legacy asbestos products. If you’re DIY-ing renovations like taking down walls, removing popcorn ceilings or replacing floor tiles, use caution. Asbestos fibres can be released into the air and inhaled.
There may be a wide range of asbestos products in your home, including paint, insulation and floor tiles. Vintage consumer products in your home such as ovens, heaters, clothes dryers and refrigerators can also contain asbestos.
Older Products in Homes That May Contain Asbestos
Appliances
Cement asbestos board siding/ undersheeting
Insulation (attic, furnace, pipe, wall)
Felt backing (flooring, roofing, wallpaper)
Popcorn ceilings
Textured paint
Cold Water Tanks
Fire Surrounds
Common Exposure Scenarios
Asbestos exposure in your home can happen in a few ways. Examples include DIY renovation, drilling through drywall, replacing an old pipe or removing popcorn ceilings. These activities can release tiny asbestos fibres into the air, contaminating the room. If fibres settle on your clothes, hair, skin or shoes, you can carry them through your home, spreading the risk to others in your household. Attic insulation in older homes may contain asbestos that could fall through ceiling cracks.
Attic Renovation
Risky scenario: While remodelling the attic of your 1960s home, you find piles of brown pebble-like insulation. You decide to replace the old insulation with new fiberglass. This would save money in the winter months. You scoop the loose insulation into some garbage bags and install the new material.
Safe scenario: You suspect your attic is insulated with asbestos-containing vermiculite. You don’t want to disturb the material, which would spread asbestos fibres into the air. You leave the insulation alone and have it professionally tested for asbestos.
Drilling into Asbestos in Drywall
Risky scenario: You decide to renovate your home and remove part of a wall to open up your kitchen. You use tools to cut and remove the drywall, which generates a lot of dust.
Safe scenario: You suspect your older home was built with asbestos-containing drywall. You’re concerned if you take down the wall, asbestos fibres from the drywall will escape into your home. You opt for testing for asbestos before starting renovations Loose vinyl tiles can expose asbestos-containing adhesive.
Removing Vinyl Floor Tiles
Risky scenario: You’ve just bought a 1950s fixer-upper in your hometown. Your first project is to upgrade the master bathroom. You decide to remove the vinyl floor tile. You remove the existing tiles with a scraper and install the new tile.
Safe scenario: You’re aware that asbestos was a common component in vinyl floor tiles in the 1950s. You know that using a scraper to remove the old flooring can release dangerous asbestos fibres. You consult an expert about testing and safe removal of the old tile or installing new tile over the asbestos-containing tile. Scraping a popcorn ceiling containing asbestos can be hazardous without proper masks and ventilation.
I have Asbestos Cement in the floor tiles in my bedroom. I leave my floor well alone, as I know how dangerous damaging the tiles can be.
Popcorn Ceiling Removal
Risky scenario: You’re tired of the popcorn texture on the ceilings in your home. You know many popcorn ceilings can contain hidden asbestos, but you decide to scrape it off and repaint with a smooth finish anyway. After putting on eye protection and a dust mask, you grab a ladder and go to work. After lots of scraping, a little sanding and some careful painting, you’re finally done.
But scraping the ceiling released tiny asbestos fibres into the air. These fibres easily got past your dust mask. This elevates your risk of inhaling asbestos fibres, which can cause mesothelioma and other asbestos-related diseases.
Safe scenario: You know that if untouched, popcorn ceilings are generally considered safe. But if you try to remove it, asbestos fibres can become airborne. You also know looking at a ceiling likely won’t help you determine if it contains asbestos. Testing is the only way to know for sure. And DIY asbestos test kits are available, but they aren’t recommended.
So you hire licensed professionals to test for asbestos. These well-respected asbestos experts have the correct equipment for the job and know how to remove asbestos according to regulations and safety measures. They safely remove the asbestos-containing popcorn ceiling for you. Asbestos insulation around pipes is not uncommon, and cutting the insulation could disperse asbestos fibres.
Cutting Insulation on Pipes
Risky scenario: When fixing up the basement of your late-1800s Victorian home, you notice the insulation around some of the hot water pipes is starting to deteriorate. To keep heat efficiency, you cut the old insulation with a utility knife. Then, you replace it with new fiberglass insulation.
Safe scenario: You know that many old plumbing systems have asbestos insulation. The insulation may pose an exposure risk even before starting the project. But cutting the damaged material would release even more fibres into the air. You hire an asbestos professional to safely remove or seal the insulation.
What Can I Do About Asbestos in My Home?
The Health and Safety Executive recommends testing your home for asbestos if the building materials are damaged or you plan on disturbing them. Testing is recommended if you have damaged drywall or insulation. It’s also needed if you’re planning to remodel.
Disturbing these materials can release asbestos fibres into the air. Generally, you can’t tell which materials contain asbestos unless they’re labelled. If the building materials are in good condition or if you’re not planning a home remodel, testing is generally not required.
If you find something in your home that you suspect is asbestos, don’t touch it. Even if the material is in good condition, the best option is to leave it alone. If you do disturb something you think is Asbestos, seal off the room and call a professional trained in dealing with Asbestos.
How Can I Tell if a Material in My House Is Asbestos?
It’s extremely difficult to identify asbestos just by looking at it, so you need to send samples to a lab for testing. It is not recommended to collect samples yourself. It’s safer to hire a trained asbestos professional for the job. They know what products to test and how to collect samples. Search for “asbestos inspection” online to find a licensed expert in your area.
What About In The Workplace?
There should be an Asbestos Register, if your workplace has Asbestos present. It should list the locations of Asbestos Containing Materials, (ACM’s) what sort of ACM it is and any other relevant information. Your workplace should also have a Asbestos Management Plan, to keep you and other employees safe. This includes a procedure for accidental exposure. You can ask your Employer to show you this information, if needed. At our shop, it is in a Polypocket, on our Kitchen Notice Board.
What Does Asbestos Look Like?
Asbestos ore in its natural form may appear in a range of colours, including white, green, blue and brown. When asbestos is processed it breaks down into fluffy fibres.
Asbestos in household products is hard to spot by sight. But you may see asbestos fibres in damaged materials that contain asbestos.
When damaged, asbestos materials may show small, fuzzy fibres. They may look like frayed fabric. However, seeing fibres protruding from a product does not mean it contains asbestos. Only testing can confirm the presence of asbestos.
How Much Asbestos Exposure Is Harmful?
In general, it takes a lot of repeated exposure to asbestos for related conditions to develop. It is rare for someone to get sick from asbestos products in their home, but it is possible. Most people with asbestos-related diseases were exposed to asbestos at work for years. About 20% of heavily exposed asbestos workers end up developing a related condition.
Asbestos Safety Dos and Don’ts
If you own an older home, take every precaution to avoid damaging materials that may contain asbestos.
Do
Avoid any contact with dangerous asbestos materials.
Take every precaution not to damage any materials that may contain asbestos.
Get a survey, when buying a home. If you are renting, ask if there is a Asbestos Inspection Report and ask for a copy of it.
Only hire trained professionals for asbestos inspections, testing, repairs or removal.
If you plan to demolish a building, contact your local Council and get a demolition survey done.
Don’t
Don’t saw, sand, scrape, drill or disturb materials that may contain asbestos.
Don’t sweep, vacuum or dust debris that may contain asbestos.
Don’t collect asbestos samples for testing without proper training.
Don’t perform any work on or near asbestos materials unless you’re trained and certified.
Don’t remove asbestos unless repair or concealment is impossible, and there’s a high risk for exposure.
Don’t dispose of asbestos materials with normal household waste.
Even if a repair seems minor, you should hire a professional when asbestos may be present. Improper handling of safely managed asbestos can create a new risk of exposure.
What do I do if I am Exposed to Asbestos?
If you are concerned that you were exposed to asbestos, start by speaking to your GP. (Do not attend A&E)Your GP can arrange tests, to see if asbestos is present in your lungs. However, it can take some time for these signs to show, so you may not be able to find out instantly. However, it will get put on your health care record that you have been exposed.
Today, I had the unfortunate job of cleaning up body fluids. I won’t say what sort of body fluids it was, (or name and shame the individual) but lets just say it was RANK and that person should of known better! 🤢 It needed full PPE to clean that mess up. It lead to a a new radio keyword for cleaning emergencies. If you are in the shop and hear “Code Brown”, you know something needs cleaning.
Put it this way, a strongly worded notice has gone up!
Anyway, lets talk about cleaning up body fluids.
Body Fluids can mean several different things: Urine, Blood, Semen, Saliva and Feces. (Poo) Of course, this is not an extensive list, but you get the idea These body fluids, pose a real risk to our health and should be cleaned up, using the correct procedure.
Think Health and Safety: Always wear the appropriate PPE, when dealing with body fluids. (Apron, gloves, protective eyewear)
The Basics
The basic principles of blood and body fluid/substance spills management are:
standard precautions apply, including use of personal protective equipment (PPE), as applicable
spills should be cleared up before the area is cleaned (adding cleaning liquids to spills increases the size of the spill and should be avoided)
generation of aerosols from spilled material should be avoided.
Using these basic principles, the management of spills should be flexible enough to cope with different types of spills, taking into account the following factors:
the nature (type) of the spill (for example, sputum, vomit, faeces, urine, blood or laboratory culture)
the pathogens most likely to be involved in these different types of spills.
the size of the spill – for example, spot (few drops), small (10cm) 10>
the type of surface – for example, carpet or impervious flooring
the location involved – that is, whether the spill occurs in a contained area (such as a toilet) or in a larger area, which is open to the public. (For instance, a classroom, or a shop_
whether there is any likelihood of bare skin contact with the soiled (contaminated) surface.
Standard cleaning equipment, including a mop, cleaning bucket and cleaning agents, should be readily available for spills management. It should also be stored in an area known to all. This is particularly important in clinical areas.
To help manage spills in areas where cleaning materials may not be readily available, a disposable ‘spills kit’ could be used. (See Below)
Equipment
You will need the appropriate equipment, for dealing with body spills
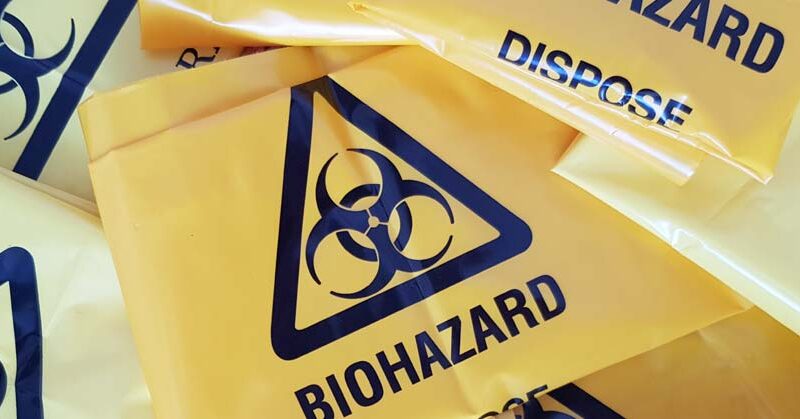
appropriate leak-proof bags and containers for disposal of waste material
a designated, sturdy scraper and pan for spills (similar to a ‘pooper scooper’)
about five sachets of a granular formulation containing 10,000 ppm available chlorine or equivalent (each sachet should contain sufficient granules to cover a 10-cm diameter spill)
disposable rubber gloves suitable for cleaning (vinyl gloves are not recommended for handling blood)
eye protection (disposable or reusable)
a plastic apron
Procedure for cleaning up Body Fluids
Small Spills
Spots or drops of blood or other small spills (up to 10 cm) can easily be managed by wiping the area immediately with paper towels, and then cleaning with warm water and detergent, followed by rinsing and drying the area. Dry the area, as wet areas attract contaminants.
A strong anti-germicide disinfectant, should always be used.
Larger Spills
Where appropriate, close off the area. (Where large spills (more than 10 cm, or where a spillage have occurred in a ‘wet’ area, such as a bathroom or toilet area) I normally use my closed for cleaning floor sign for this. The spill should be carefully washed off into the sewerage system using copious amounts of water and the area flushed with warm water and detergent.
Where the spill is on the floor: Use a spills kit, to contain the spill. A scraper and pan should be used to remove the absorbed material. Use blue paper towels to scoop up the the granules, which should be put into a yellow clinical waste bag. The area of the spill should then be cleaned with a mop, and bucket of warm water and detergent. The bucket and mop should be thoroughly cleaned after use and stored dry.
Large blood spills should be contained and generation of aerosols should be avoided.
The Use of Bleach
It is generally unnecessary to use sodium hypochlorite (Bleach) for managing spills, but it may be used in specific circumstances. It is recognised, however, that some people may feel more reassured that the risk of infection is reduced if sodium hypochlorite is used. There is no evidence of benefit from an infection control perspective. Hypochlorites are corrosive to metals and must be rinsed off after 10 minutes and the area dried.
However, in many places, a blanket is in place, prohibiting the use of sodium hypochlorite, so it may not be possible to use bleach, depending on the policies n your workplace. We at BHF, are not allowed to use bleach, so a strong anti-germicide disinfectant, is what I will use.
Spills Kits
While spill kits are designed for certain spills, all spill kits usually consist of the same three elements: PPE, sorbents, and clean-up items.
Spills Kits include the following:
Personal Protective Equipment (PPE): Whether the kit is designed for oils pills or a battery acid spill, there is always some type of PPE included in a spill kit. The most common types of PPE used for spills are eye and face protection, gloves, booties/shoe covers, and chemical spills usually require the use of a disposable lab coat, respiratory protection, and a corrosive resistant apron.
Absorbents: These are items like mops, cloths, sponges, loose powder, etc. that are created out of material capable of absorbing and containing a spill. Absorbents in put in kits based upon the type of material they are designed to soak up. For example, all-purpose absorbents are placed in universal spill kits, but a battery acid spill kit is much more likely to contain and absorbent with a chemical neutralizer.
Clean-up materials: Spill kits should have a dust pan or scoop to soak up the spill. Kits will also almost always include plastic bags for used PPE items to be put in for disposal. The kit itself should come in a container large enough for the potential spill. In addition to having appropriate supplies to clean the pill, the kit should include disposal materials and instructions for the worker. By properly disposing of spills and the clean-up of spills, it reduces/eliminates the potential for an environmental or public risk hazard.
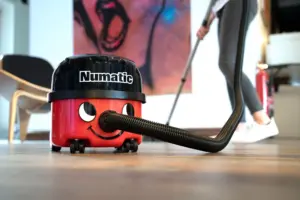
Your Vacuum Cleaner is one of the most important tools, in your arsenal of cleaning equipment. Tub Vacs, come in all shapes and sizes, from the Numatic International range of tub vacs, (Henry, Hetty, George etc) to machines that can do wet and dry, shampooing and machines specialising in picking up hazardous materials.
So it is important that we keep our tub vacs properly maintained. If dirt builds up in the machine, it can lose suction power, making it less efficient, or cause it to block or even overheat, which can lead to a fire. A well maintained tub vac is a happy tub vac and will give you years of faithful service, if it is well looked after.
In this guide, we will look at how to maintain your tub vac and keep it at it’s best.
Clean the Filters Monthly
Dust and debris can build up quickly on your vacuum’s filter, reducing its suction power. That’s why it’s important for you to clean it out every month.
If they are washable, rinse them under luke warm water. Do not use any chemicals, as this can damage the filter. If it is non washable, take it outside and give it a hard whack against a wall, to dislodge any debris.
Think Health and Safety: Make sure to wear a dust mask and protective clothing when cleaning non washable filters. The face mask, will stop you inhaling the dust, while the protective clothing, will prevent you from getting dirty!
Clear any Blockages
Tube and/or hose blockages in your vacuum cleaner are another cause of poor suction. Fortunately, it’s easy to clear them.
For the floor brush, use a screwdriver to undo the screws holding the brush assembly. Be careful when removing the brush, as the plate is spring loaded. You can then use a flat head screwdriver, to pull the gunk out the neck of the the pipe. On some models, the neck has a clip, which allows you to disassemble it.
For the pipes: Disconnect the pipes from your tub hoover and use a hose to wash out the inside. You can feed the hose down the pipe, is it is easier. You can also do this for the telescopic poles too. Make sure to wait for the pipes \ poles to dry, before recaching them to your tub hoover.
Empty the Bag When Full
Your Tub Vac will loose suction, once the bag is full. Once it is full, it will need changing. You risk causing the bag to explode, if you carry on using the tub vac with a full bag. So it is important to stop when the bag is full and swap it for a new bag.
Keep your Tub Vac Clean
I wash out my Tub Vacs once a week. Thankfully, the motor casing, clips onto the top, so I can wash out the tub where the bag sits. This involves removing the motor off the top and removing the bag. Then I wash out the tub out with mild disinfectant and warm water. Once washed out, I tip out the water and use blue paper roll to dry it out, before reattaching the bag and motor casing.
I also give the outside of the casing a wipe, with a damp cloth, making sure to be careful around the switches. Alternatively, cleaning wipes, is another good way to give the outside of your tub vac a good clean.
The wheels are what keeps your tub vac moving and they can also get caked up. I spray mine with a little DW40, to get the gunk loosened and then use my flathead, to remove the grease and gunk from the wheels.
Check the Hoses, Plug and Cabling Regularly
You should check your hoses, to make sure they are not kinked or have tears in them. This can inevitably cause loss of suction. Kinks can easily be fixed, by gently untwisting the hose. Tears on the other hand, will require a replacement hose. This will be something that your supervisor will normally need to order.
It is important to check the cabling, to make sure it isn’t damaged and inspect the plug, to make sure that it is secure, isn’t damaged and the pins are not loose. I also check the cabling for nicks in the sheath and for any damage to the cable itself. I check both my tub vacs, each time I use the Tub Vac. If your machine has a damaged plug or cabling, DO NOT USE IT – Put a Notice on it to warn others not to use it and report it to your supervisor.
The same goes, if the motor is making fully sounds or if you smell burning. In these cases, yank out the plug, alert your supervisor and put a do not use notice on it.
Talking of cabling, it is important not to overstretch the cabling when vacuuming. This can cause the cable to become damaged. It is also important not to allow cables to trail across a room, as this can be a tripping hazard. Where possible, unplug and move to another socket, when hoovering a large space. If this is not possible, put a Cleaning In Progress Sign, over the cable, so people can see you are cleaning.
Make sure to use the cable rewind, if your tub vac has one. If not, make sure to securely wrap the cable round the machine and secure the plug, when storing.
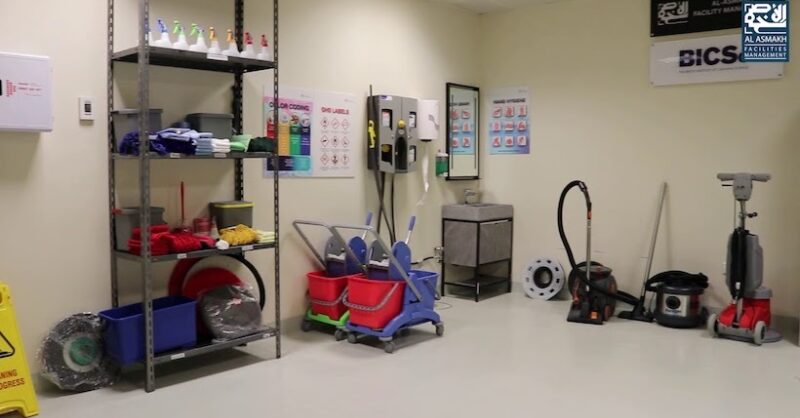
It is important that you keep your cleaning store organised. This helps to make your job easier, as you will be able to find everything much quicker.
Lets have a look at how we organise your cupboard or cleaning store.
Mechanical Equipment
Mechanical equipment, such as vacuum cleaners, floor polishers, scrubber washer dryers, trollies, and buckets, should be kept together, against the edge of the wall. Drum vacuum cleaners, should have their hoses disconnected and should have hoses hung on hooks. In addition, wet floor signs should be either
Mops
Mops should be hung up to dry on hooks. the mop head should never be allowed to touch the floor, as this can cause cross contamination. Spare mop heads should be kept on the shelves, in your cleaning store.
Scrubbing and Polishing Pads
These should be rinsed out and then hung up on hooks to dry out.
Organising Your Shelves
Your shelves should be tidy, with everything neatly organised. I suggest having a shelf for your cloths, bin bags, dusters etc. On another shelf, have your chemicals, making sure that your frequently used chemicals, (such as toilet cleaners, cleaning sprays etc.) Make sure that you rotate your stock, to make sure that you use the older chemicals 1st.
On your very top shelf, keep your paper products, such as toilet rolls, paper towels, blue paper rolls etc.
I suggest having a pair of plastic swing bins under the shelves. One can be used for keeping your clean mop heads in. (Such as Kentucky Mop Heads and Socket Mop Heads) Use the other one for your dirties, which need to be laundered. (Mop Heads and Cloths)
Finally, keep all your 5L bottles on the floor. (Floor Cleaners, Floor Polishes, Strippers and Liquid Soap, that come in these commercial size containers.
Keep Your Store Clean
Like anywhere else, it is a good idea to keep your cleaning store clean. Make sure the shelves are wiped down at least once a month and make sure the floor is swept and mopped once a week. Always clean your “Hopper Sink”, each time you empty a bucket or use it to wash out equipment. This will help to maintain a hygienic environment.
Washing Dirty Cloths, Mops and Other Equipment
Mop heads, cloths, tabards etc, should be machine washed, at a minimum of 60 degrees. You should put equipment for the wash, into a red dissolvable bag and placed in your dirty laundry bin, Doing this, means that you don’t have to touch dirty equipment again, when putting it in the washing machine.
Personal Hygiene
It is important that you regularly wash your hands, even if you are wearing gloves. This is a important infection control measure. Alcohol gel is another really good way to keep your hands clean, if they are not visibly soiled and you are not near a sink.


 I clean my filters once a week. This involves removing Henry’s hat. Thankfully this just unclips and lifts off. Remove the filter and take it outside. Bang it against the wall, to release any debris. Put the filter back on, (making sure it goes in the right way) then replace Henry’s hat. This only goes on one way and should have the word Henry, aligned right above the eyes on the tub. Clip the hat back on and test that it is secure, by trying to lift him with the handle.
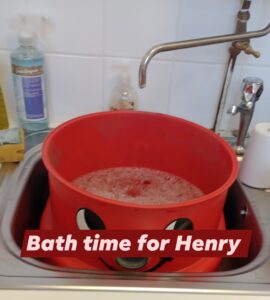


 Your Vacuum Cleaner is one of the most important tools, in your arsenal of cleaning equipment. Tub Vacs, come in all shapes and sizes, from the Numatic International range of tub vacs, (Henry, Hetty, George etc) to machines that can do wet and dry, shampooing and machines specialising in picking up hazardous materials.